misolarcasero.com


Our solar collectors need a temperature sensor, as well as our tank.
The basic and necessary function of these sensors is to compare the temperature differences between the tank and the collector.
Both temperatures can offer us other functionalities, such as limiting the temperatures of the devices in extreme temperatures or freezing.
But the part The fundamental aspect of monitoring temperatures in the solar heater is knowing when to bring the water from the collector to the tank, and when to stop doing so, all to finally obtain the hottest water possible in our tank.
We must know that these temperature sensors are strictly necessary in a forced circulation solar heater system.
If your solar heater model is based on the thermosiphon model, it will not be necessary, but you will need it if you want to know what temperature your tank is at, or if you require the use of an auxiliary backup heater.
There are several types of temperature probes, and depending on their type, this will be the case. its reading reliability and durability.
If you want to know more about the type of temperature probes you can use, click on Types of temperature probes
Temperature sensors or probes that come with metal casing (I mean bare probes without the sheaths) are theoretically more or less watertight. Some commercials even claim this.
But from my own experience I have been able to verify that this watertightness fails over time, completely losing the probe irremediably.
The probes must always be inside a sheath for thermostatic probes.
Thus that we will have to manage to correctly introduce each sheath in its necessary place.
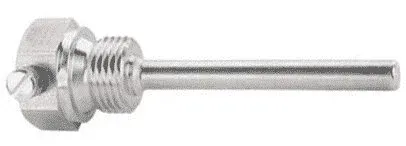
This is the sheath to install the temperature probe properly:
This sheath, as you can imagine, is hollow, and the sensor goes inside it.
Its function is to put the thermal probe in contact with a medium that is totally protected from any fluid.
As the sheath is metallic, its thermal conductivity is suitable for this.
In other words, it is used to introduce the probe into the water, without it getting wet.
Or we could also say that we are going to waterproof our temperature probes with the use of these sheaths.
In other words, it is used to put the probe into the water, without it getting wet.
Or we could also say that we are going to waterproof our temperature probes with the use of these sheaths.
In other words, it is used to put the probe into the water, without it getting wet. the inside of the case is of interest to us and we should put a little bit of , although it is not really mandatory.
The idea is to make the temperature probe able to more quickly receive the change in temperatures that will occur on the outside of the case.
This thermal paste is the same one we use in cooling desktop or laptop processors.
We are interested in this case being provided with a screw, This will help us to secure the cable and keep the probe from moving from its place inside.
If we use thermal paste, there is even more reason to use this screw.
The sheath must strategically pass through the container to be measured, without allowing the container in question to lose water.
I explain the correct way below.
Representation of the elements mentioned in the photo in the case of the introduction of the probe and sheath in the collector:
A) Represents the collector box
T) Represents the T to connect the probe to the collector's water circuit
C) Represents the extension of the collector through the "T", to introduce and immerse the sheath
J) Common plumbing joint so that the water touches the sheath but does not come out to the outside
V) Sheath
S) Temperature probe
It may happen that you cannot find a female terminal to connect to the "T", and your plumbing establishment offers you the standard male connector, and a female-female adapter.
It would be the same assembly as the previous one, with the adaptation of connectors.
Representation of the elements mentioned in the photo in the case of the introduction of the probe and sheath into the collector:
A) Represents the collector box
T) Represents the T to connect the probe to the collector water circuit
C1) Represents the extension of the collector through the "T" to insert and submerge the sheath
C2) Female-female adapter to couple the sheath to C1
J) Common plumbing gaskets so that the water touches the sheath but does not come out
V) Sheath
S) Temperature probe
This was my probe inserted with the coupling and gasket.
In this case there is no sheath, and that was my big mistake, because the probe ends up breaking down because of the water.
But the example of how the "T" looks in the collector and the coupling of the probe and sheath is worth it
It is always located at the top of the collector, which is where the the hottest part of the collector.
We could also place it at the bottom, but this could be inaccurate, since the water at rest tends to form a gradient where the heat stays at the top and the back part cools down.
As can be seen graphically in the previous drawing, the probe in the collector is installed at the top of it, in the passage of water.
For the tank we cannot use copper terminals because they have little surface to hold onto the tank, especially if the tank is made of plastic material.
So for this case the most appropriate is a wall grommet.
A wall grommet is this:
The wall grommets that we are going to use are very typical and easy to find in the plumbing and/or plumbing section.
It is advisable that it be a plastic or PVC wall grommet, to avoid oxidation and reactions with water.
First we will have to drill holes in the tank and install the bushing so that it is completely watertight.
The bushing will probably be about 1" and our copper tube will be 15mm.
So in this case we will look for an adapter.
On the copper connector, we will make the following connections. (It goes without saying that if the connector is a male female, we will need a female-female adapter in the same way as explained in the previous one with the collector)
I explain graphically:
Representation of the elements installed in the tank:
D) Represents the water tank
P) Represents the bushing
J) Represents a common joint plumbing, to pass through the sheath without the water escaping to the outside
A) Adapter to attach the sheath to the bushing
V) Sheath with the temperature probe inside
S) Temperature probe